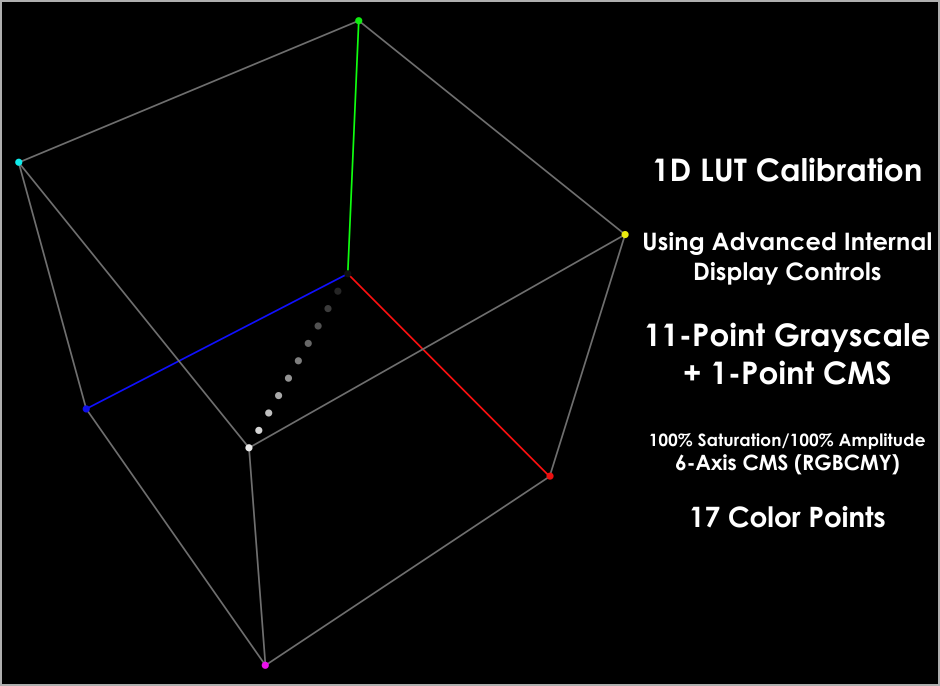


We have to take multiple measurements using Grayscale and Color Gamut patterns for the 1D LUT calibration to perform RGB Balance of Grayscale steps, Gamma and calibrate the Color Gamut using the 6-Axis CMS controls by measuring 1-Point per Primary/Secondary Colors.
This type of calibration requires the user to perform a lot manual actions such as finding the required chapter in the calibration disk and navigating and locating the color patch that the calibration software needs to measure using the Blu-Ray/Media Player remote control.
When each color patch is displayed, the user has to click the calibration software to take a single measurement and later press the next chapter button on his Blu-Ray / Media Player remote control when the meter has successfully measured each color patch.
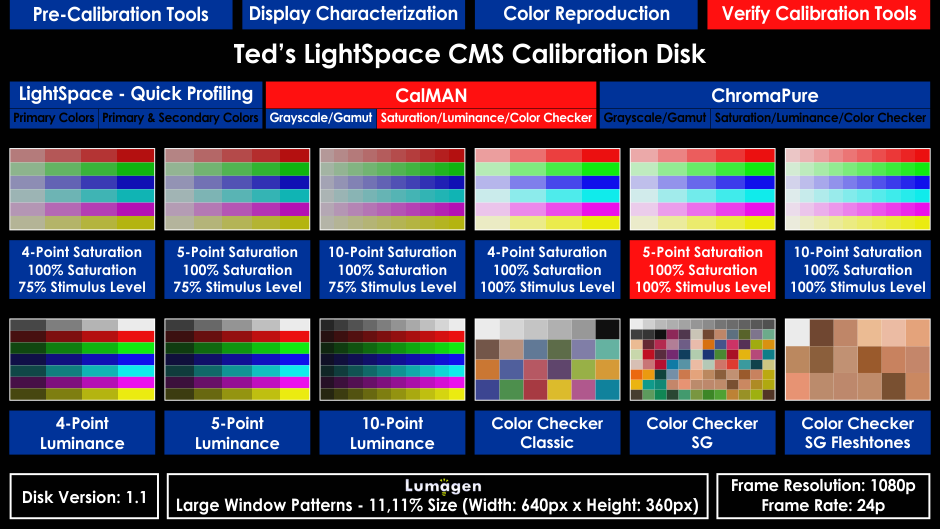
Ted's LightSpace CMS Calibration Disk is the only available calibration disk that has been created based on the exact same pattern order sequence of any CalMAN/ChromaPure type of measurement run (Grayscale/Gamut/Saturation/Luminance/Color Checker etc.) and it uses the exact RGB Triplets that the CalMAN/ChromaPure Engine expects for calculating the dE errors.
Also, there are no % indicators or color patch names displayed on any color patch window or on the background (like other calibration disks). These are pure color patch windows, the same as if they had been generated by an external pattern generator. Before displaying any color patch there is a 1.5 second Pattern Info announcement screen followed by 0.5 second of Black full field pattern to prevent any temporary image retention to clear the panel of the last displayed color patch.
Each Pattern Info text (for example: 10% Gray, 20% Gray etc.) is available at the right side of the screen because at the center of the display you will have placed or aimed your measuring instrument.
The maximum time that each color pattern displayed is 10 seconds. If you need to extend that time you can use the pause button using your Blu-Ray/Media Player remote control. We did that because many LED-LCD displays are Auto-Dimming their backlights. Also, Plasmas reduce their light output when you will leave the same pattern displayed for a long time.

In addtion to the available classic manual pattern change using the next-previous chapter buttons of the Blu-Ray/Media Player device remote control, Ted's LightSpace CMS Calibration Disk has the following 2 additional measurement solutions to address and reduce the required user actions:
Since all chapters are based on the exact color patch order sequence that each software (CalMAN/ChromaPure) requests, the color patches are auto-changing to the next required color patch per measurement run. There available 3 options of displaying time per each color patch: 2/6/10 sec.
The CalMAN/ChromaPure user has only to select one of these 3 options and let the entire chapter flow. There is no need to use the Blu-Ray/Media Player remote control until the end of the selected measurement chapter since the color patches will be displayed with the exact order as CalMAN/ChromaPure requested them.
This semi-automated solution saves some time and it reduces the total required user actions.
The only user action needed is to click the single measurement button each time he sees on his display/projector each new color patch.

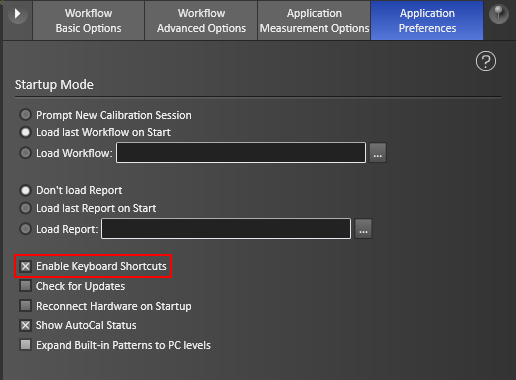
As an alternative method, the user can use only his keyboard. The F5 key button is the CalMAN keyboard shortcut for a single meter measurement.
The users have to enable the Keyboard Shortcuts feature from CalMAN's Application Preferences.
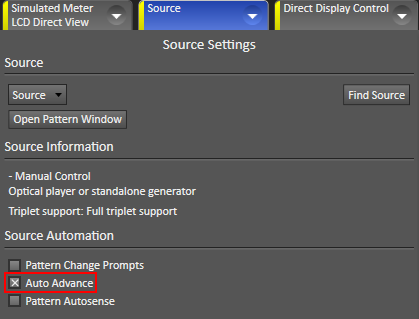
There is an initial setting before starting the measurements with CalMAN which users have to enable from CalMAN's Source Settings -> Source Automation -> Auto Advance feature.
This will force the pattern slider to automatically move to the next color after each single meter measurement.
Since the ChromaPure measurement module does not automatically select the next required color there is one added action required of the user.
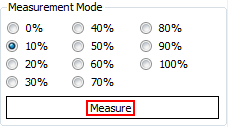
After the user's mouse click to 'Measure' button in ChromaPure, he will see on his display/projector the color patch:
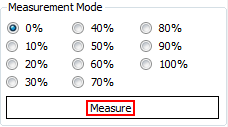
The user later has to manually select the next measurement radio button...
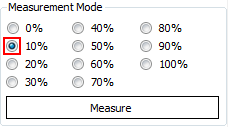
...and click the 'Measure' Button again when he sees the next color patch on his display/projector.
This semi-automated solution saves some time and reduces the number of required user actions.
The user has only to perform a few initial actions using an external batch utility that sends timed 'single meter measurement' commands to CalMAN. After starting the automated measurement procedure there is no requirement of the user to use his mouse or Blu-Ray/Media Player remote again until the end of measurement run. The measurement procedure becomes automated.
This feature is exclusively available only for Ted's LightSpace CMS Calibration Disk users. It moves the calibration measurements to a new level since it brings closer to the user the experience of an automated measuring. It's a feeling like 'using an external pattern generator' but without spending extra money to buy an external pattern generator or an IR-Controller.
After running that Batch File Utility and selecting the Chapter of the measurement run needed, the user only has to press a key when he sees the first patch info screen on his display/projector. After that the user can leave his Blu-Ray/Media Player remote and PC mouse, move back, and see the automatic color patch change and watch only the CalMAN Charts bars & dE numbers.
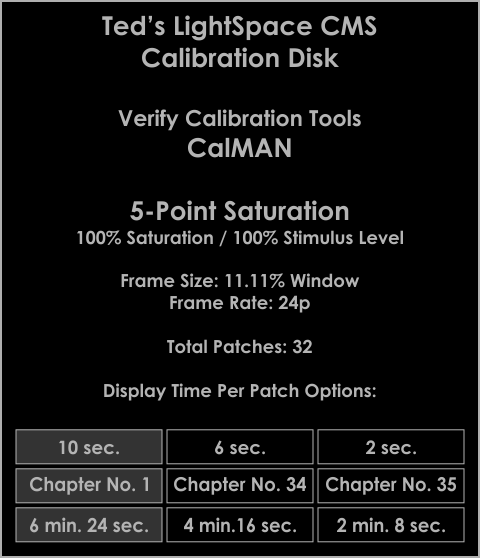
CalMAN Users of the Version 1.1 of Ted's LightSpace CMS Calibration Disk have 3 options of display time per color patch: 2/6/10 sec.
To select one of these 3 automatic pattern change options, the user has to select the Chapter number using his Blu-Ray/Media Player remote.
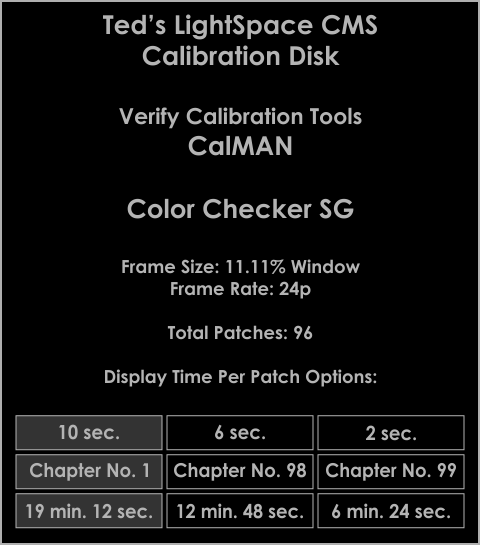
These Chapter numbers (Chapter No.) are available on each Chapter initial Info Screen.
For example, to navigate directly to CalMAN's ColorChecker SG with 2 sec. per color patch Chapter, the user has to press '99' using the number pad on his Blu-Ray/Media Player remote.
Klein Colorimeter users will be able to use 2 sec per pattern to measure every chapter rapidly. i1Display PRO, SpectraCAL's C6, XRite's i1PRO1/2, and basICColor DISCUS users will be able to use the 6 or 10 second display time per each color patch chapter.
CalMAN 5 has some keyboard shortcuts for meter measurements and slider control actions.
For example, the 'F5' keyboard button takes a single measurement. With the AutoAdvance option enabled from CalMAN's Source Settings, the slider will select the next color automatically after each single measurement.
We have written a Batch Utility that you have to run initially and select what type of measurement run the user wants to perform using the CalMAN's 5 Automated Measurement Procedure.
The Batch Utility has been programmed to send automatically all the required timed keyboard shortcut commands to CalMAN 5 for controlling the meter and the CalMAN Slider.

For example, when the user uses the Batch Utility to select the ColorChecker SG (96 Color Patches) Chapter, the user has to enter '10' to select that Chapter from the Batch Utility initial menu screen and later only needs to press a single keyboard key when he sees the first patch info screen on his display/projector screen.
After that simple user action the Batch Utility will send all the required timed commands to CalMAN 5 without requiring any other user input.
That Batch file contains a series of DOS commands that perform the required tasks for the entire Automated Measurement Procedure.
We are using the WinSendKeys utility to send the keyboard shortcut commands.
Now anyone will be able to take long measurement runs like 10-Step Saturation/Luminance or ColorChecker SG automatically.
Here you can see a detailed example showing how the CalMAN 5 Automated Measurement Batch Utility works.
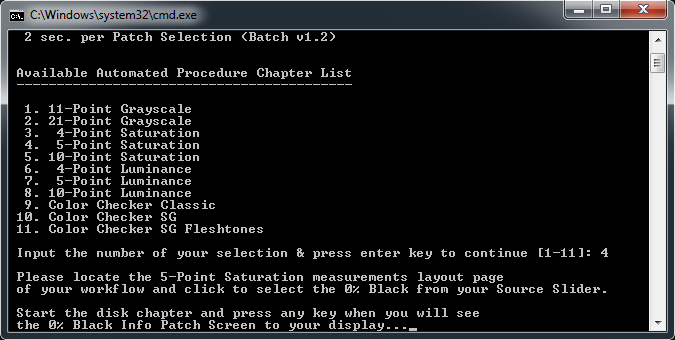
We will take the scenario that the user wants to measure his display/projector performance using the CalMAN's 5-Point Saturation Chapter of Ted's LightSpace CMS Calibration Disk using the Automated Procedure Measurements Utility.
Here are the required steps:
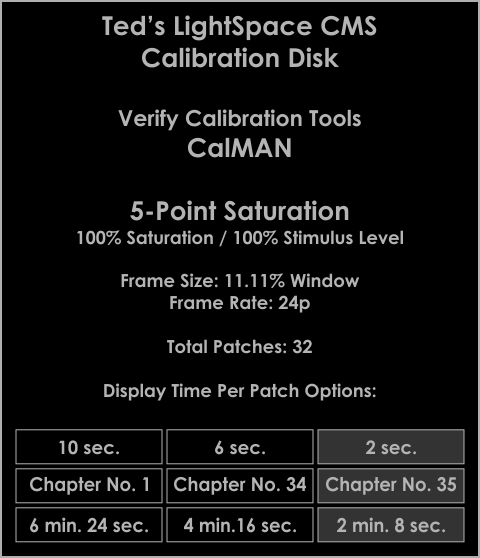
* I will use the 2 sec. per color patch Batch file for this example.
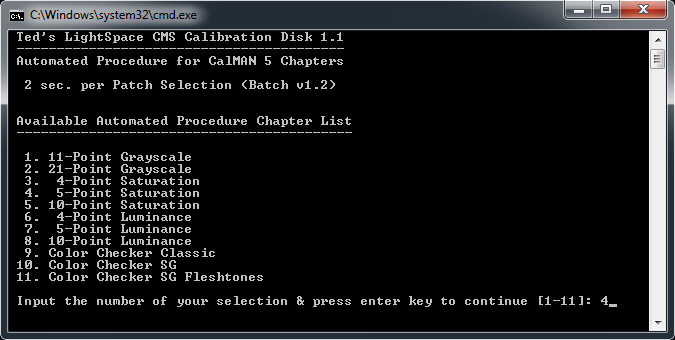
This is the Batch File Main Menu. From there you see the available disk chapters which the Automated Measurement Procedure is supporting.
The Batch Utility will wait until the user enters the chapter number of the measurement type he wants to perform:
After pressing 'Enter' key, the user will see the following screen:
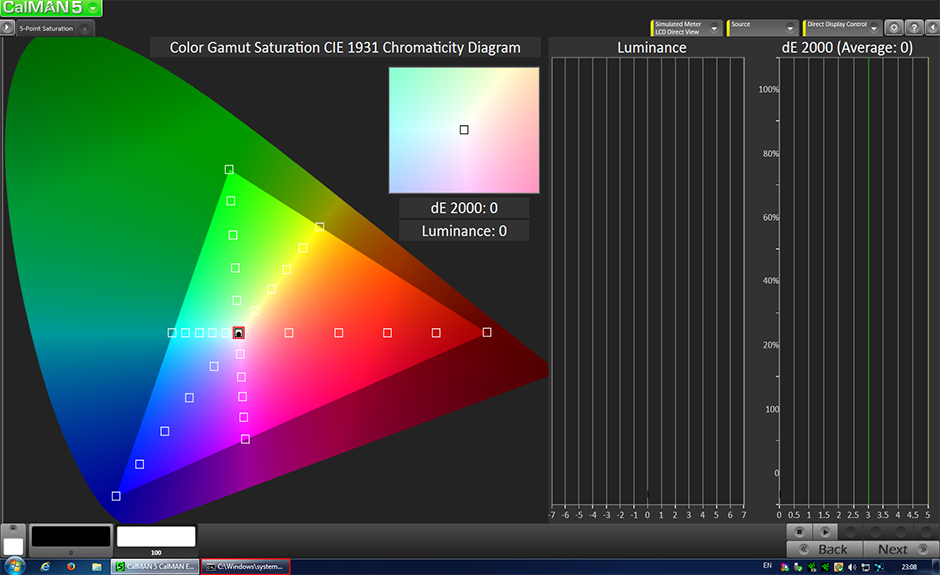
The user can use any custom or official CalMAN 5 workflow layout page that is configured for 5-Step Saturation measurements.
I will use for that example one of the three exclusive CalMAN 5 Workflows which all the Ted's LightSpace CMS Calibration Disk users will have access.
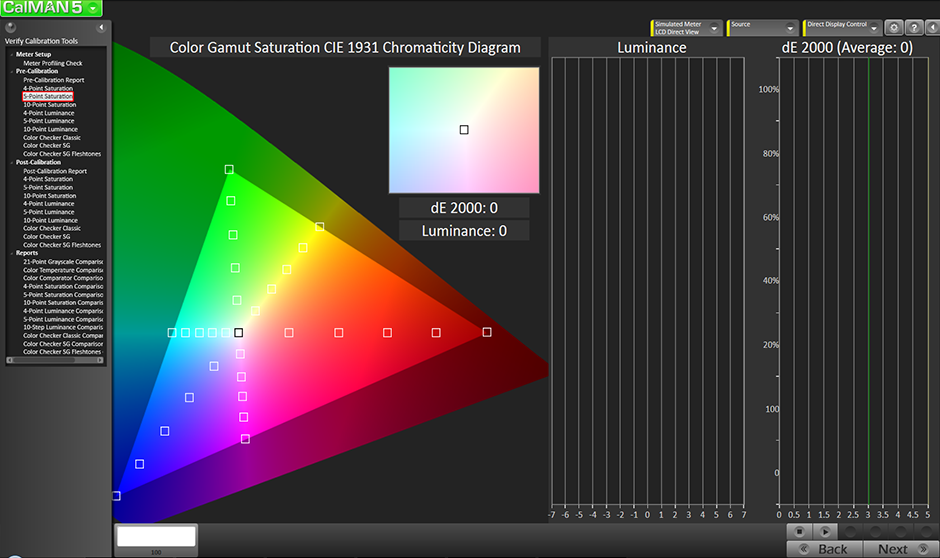
Select from the Verify Calibration Tools Workflow the 5-Point Saturation layout page:
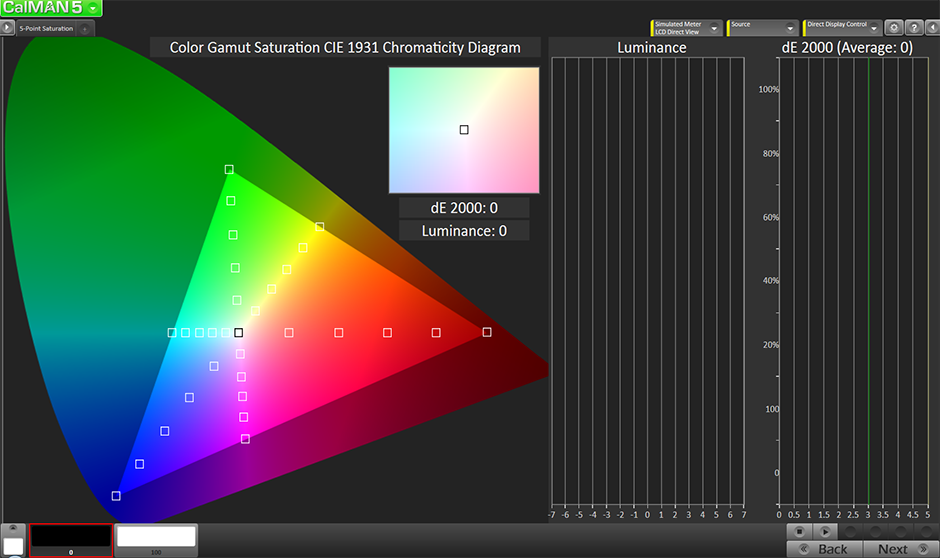
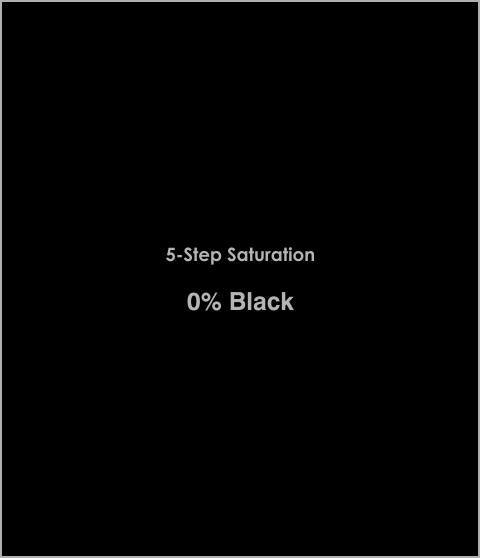
From the CalMAN's Slider click to select the 0% Black Patch as the Batch Utility requests for this 5-Point Saturation measurement run:
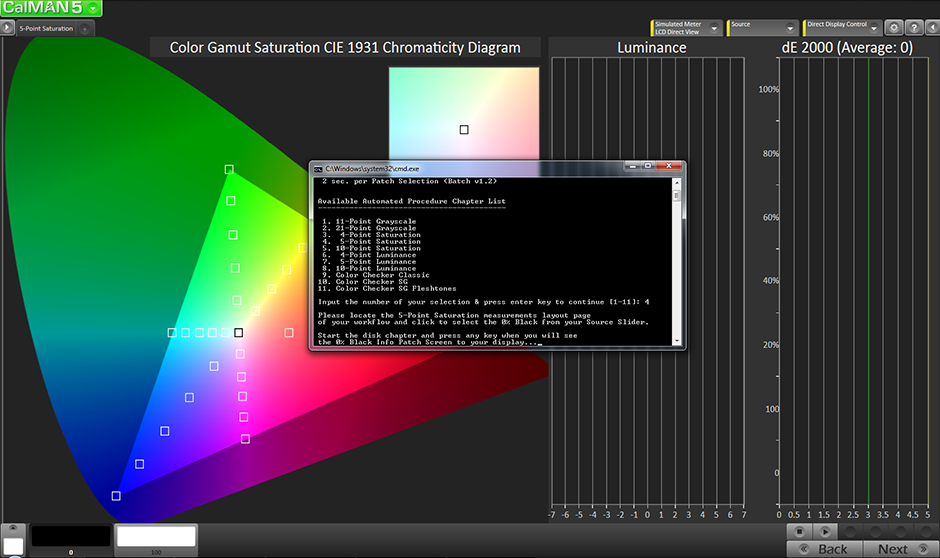
This will bring the Batch Utility window in front of CalMAN window while the Batch Utility is waiting for the user to press a keyboard key to start the Automated Measurements Procedure. Don't press any key at this time.
For Media Files Version of the disk, users can locate the CalMAN Folder and select the 5-Point Saturation MP4 or MKV file.
Here we can see each Automated Measurement Chapter number. For example the 6 seconds per patch Chapter is the number '34'.
As we used for that example the 2 sec. per patch chapter, the user has to press '35' using the number pad of his Blu-Ray Remote to use the 2 sec. per patch chapter.
After entering that number, a new Chapter Info Screen will be displayed for 5 seconds.
The user must now be ready to press the keyboard key to start the Batch Utility Automated Measurements Procedure.
When you see the first frame of this first Pattern Info Screen of 0% Black (see screen shot below) on the display/projector screen, the user has to press immediately a keyboard key:
The Batch Utility window will be automatically minimized to the taskbar and this will bring the CalMAN 5 window to the front of the desktop.
There no other user input required until the end of this 5-Step Saturation measurement.
The user can see how simple and useful this unique feature is.
It's like using an external pattern generator to generate the patterns for you, and the most important aspect is that you are calibrating using your actual movie playback source, because external pattern generators can't see or ignore any source output errors.
The user can use CalMAN's virtual meter to do a quick testing before preparing his meters for real measurements.
We have tested these Batch Files using Klein K-10A, i1Display PRO, SpectraCAL's C6, X-Rite's iPRO1/2, and BasICColor DISCUS meters without any problems.
It's recommended for any user to initially find which one of the 2/6/10 second per color patch Chapter works on his setup and later move to that Batch Utility Automated Measurement.
Remember that if the Semi-Automated Measuring Procedure works on a given setup, this guarantees that when using the same meter settings, the Fully Automated Measuring Procedure will work to that setup also.
Try to take the measurements the semi-automated way as you were doing previously.
For example, use the 6 sec. per patch chapter to see if any measurement takes more than 6 seconds to return results.
If this is happening with your current meter settings, it will break the sync of the Automated Measurements Procedure later.
Try to reduce the Standard Exposure Mode of the Meter Settings and this will reduce the required time your meter will need to read each patch.
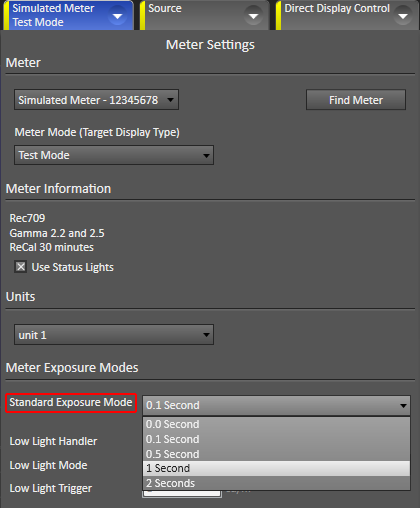
For SpectraCAL C6 users it is recommended to use a fixed exposure time setting and not x Sample setting because low luminance patches will require more time to return results and will break the Automated Measurement Procedure sequence when you read a Black Patch or generally dark patches like 5/10% Gray or 5/10/15% Luminance etc. In some cases the SpectraCAl's C6 will take about 15/20 sec to read black.
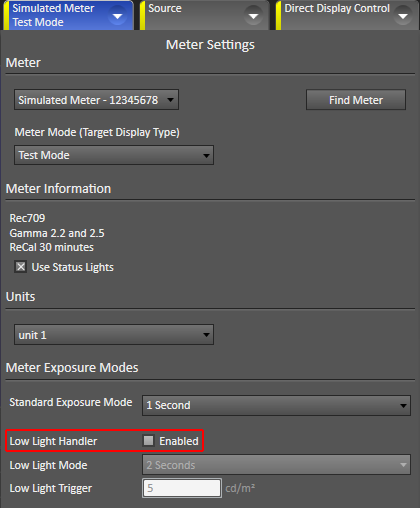
If this happens, disable the Low Light Handler on the Meter Settings. This will reduce the required measuring time of low luminance patches also.
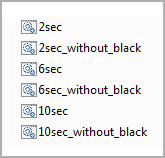
To address the problem of long meter measurements, we have included some Batch Utility Files versions that skip the Black Patch measurement on every supported Automated Measurement Chapter.
This is a list of the available Batch Utility files for Automated Measurements Procedure for CalMAN 5 users:
The Batch Utility files are using MS-DOS commands and they have been tested and work on Windows XP, 7, 8 by us so far.
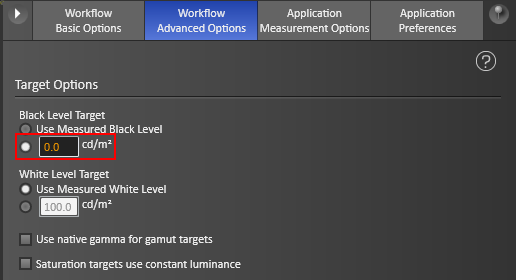
In that case you will need to enter manually the Black level luminance (cd/m2) of the display which is located in CalMAN’s Workflow Advanced Options.
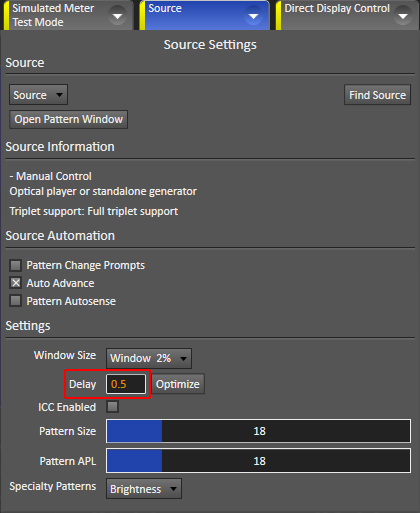
It’s optimum to set the Source Pattern delay at 0.5 sec. (or at 0) on CalMAN's Source Settings.
TThis is something that has to be done on each display independently and it needs some testing to find out which delay setting works best for your setup.
This website uses a Comodo Positive SSL certificate to protect online transactions with the highest strength encryption.